How to Pull the Perfect Espresso Shot at Home: Barista Guide

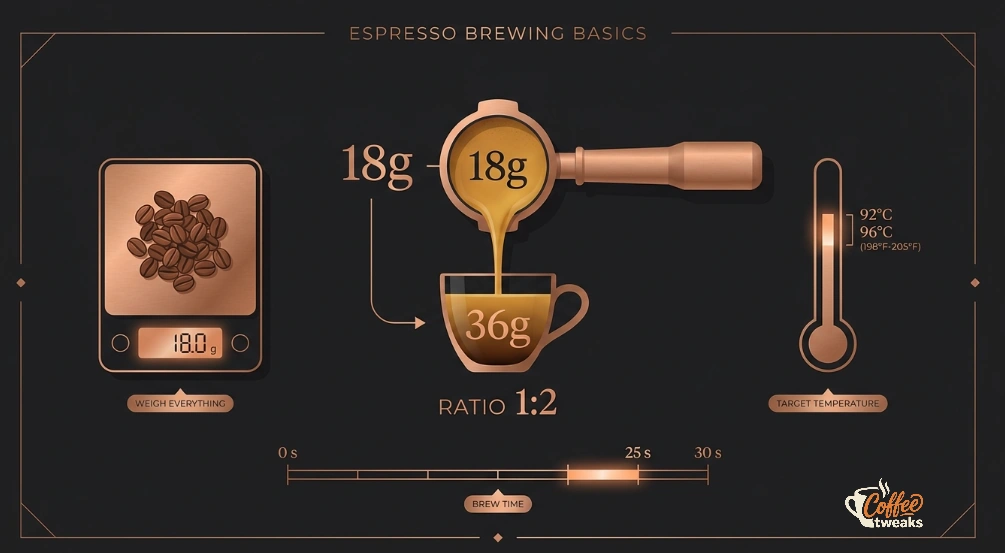
The ideal home espresso recipe: 18g of coffee in, 36g of liquid out, in roughly 25–30 seconds. That is a 1:2 brew ratio and the best place every beginner should start. Target dose: 16–18g depending on your basket size. The biggest beginner mistake is changing the grind, the dose, and the yield all at once, then having no idea what actually fixed or broke the shot.
The fastest single improvement most beginners can make is buying a $15 kitchen scale and weighing every dose and yield. That one habit closes 80% of the inconsistency gap overnight.
Here's the thing nobody tells you when you get your first espresso setup…
Bad shots are not a machine problem. Most of the time, they are a ratio problem, a grind problem, or a process problem.
I know that stings a little. You spent real money on the equipment. But great espresso is roughly 30% machine and 70% technique, and technique is free to fix.
I've been there. Six years ago, I bought my first espresso machine thinking good coffee would just… happen. It did not. For weeks, every shot was either sour and weak or bitter and harsh. I blamed the machine constantly. It was not the machine.
This guide is the article I wish I had back then. By the end of it, you should be able to pull a noticeably better shot, possibly today.
The Perfect Espresso Recipe (Before You Do Anything Else)
Before any technique, any troubleshooting, any gear, you need a baseline recipe to work from.
Here it is:
| Variable | Target |
|---|---|
| Dose (dry coffee in) | 18g |
| Yield (liquid espresso out) | 36g |
| Brew ratio | 1:2 |
| Shot time | 25–30 seconds |
| Brew temperature | 93–96°C / 199–205°F |
| Pressure | 8–10 bar |
This is your starting point. Not a guarantee. Not a universal truth. A starting point.
The numbers matter here. Most beginners skip the scale entirely and go by volume — which is the fastest way to get inconsistent results, because crema volume varies shot to shot and it lies to you about how much liquid is actually in the cup.
Weigh everything. Seriously. ⚙️
What Dose, Yield, and Time Actually Mean
The Three Variables That Control Everything
Espresso is not complicated at its core. It is three things in a relationship:
Change one, and you change the taste. Change two at once, and you lose track of what caused what. Change all three simultaneously and… honestly, good luck.
The ratio is just dose divided into yield. 18g in, 36g out = 1:2. That is a normale — the standard starting point used across the specialty coffee world.
Why Ratio Matters More Than Volume
Technically speaking, but also taste-wise… the ratio controls strength and extraction simultaneously.
A shorter ratio, say 1:1 or 1:1.5, gives you a ristretto: dense, concentrated, intense. A longer ratio, 1:3 or beyond, gives you a lungo: lighter body, more extracted, less intensity.
Most beginners should live in the 1:2 to 1:2.5 range. It is the most forgiving. It is also where most sour-shot problems get solved, because pulling a slightly longer yield extracts more sweetness from the puck without changing anything else.
What You Need Before Pulling a Shot
The Gear That Actually Matters
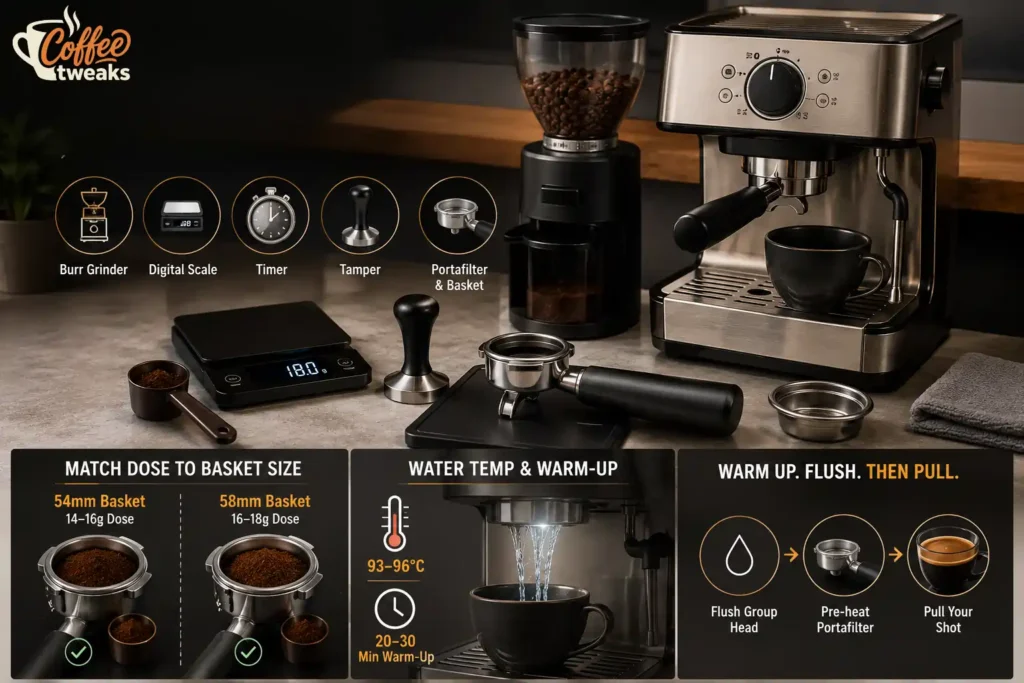
You do not need expensive gear to pull a decent shot. You do need a few specific things:
That is the actual short list. Everything else is useful eventually, but not on day one.
Matching Dose to Basket Size
Here is the thing nobody tells you about baskets…
Most home machines ship with a pressurized (double-wall) basket and a non-pressurized basket. The pressurized basket has a small hole at the bottom; it is forgiving of coarse grinds and cheap grinders, but it also masks extraction problems. You will not taste the difference as clearly.
Once your grinder can handle a proper fine grind, switch to the non-pressurized (single-wall) basket. Espresso becomes far more accurate and more honest about what you are actually doing.
For basket sizes: a 54mm basket typically suits 14–16g doses. A 58mm basket is designed for 16–18g. Overfilling or underfilling a basket creates channeling problems before you even start. Match the dose to the baske, not the other way around.
Water Temperature and Machine Warm-Up
Brew temperature is not something most beginners think about. They should. ⚙️
The target range is around 93–96°C. Too cool and your espresso under-extracts into sourness. Too hot and it over-extracts into harshness. Most home machines take 20–30 minutes to fully stabilize at brew temperature, not just the 2-minute “ready” light.
I measured this. On multiple machines, shots pulled immediately after the ready indicator are cooler and more sour than shots pulled after a proper 25–30 minute warm-up.
Run a blank shot (no coffee, just water) to flush the group head and pre-heat the portafilter. Then lock in and pull. This single step, which costs you nothing, removes one of the most common sources of inconsistency.
The Home Barista Guide to Pulling a Perfect Espresso Shot
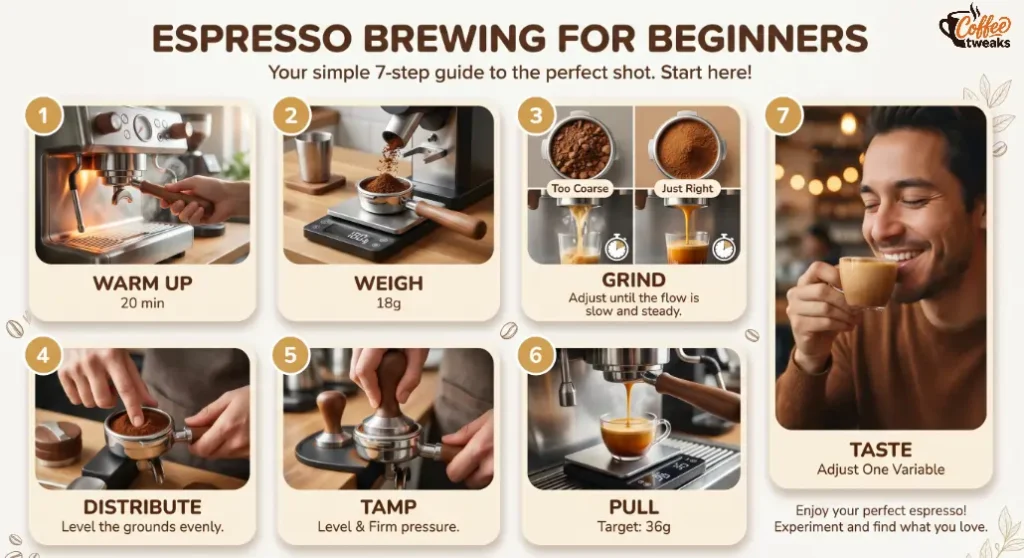
This is the core of it. Seven steps. Do them in this order, every time. ☕
Step 1 — Warm the Machine and Portafilter
Turn on the machine at least 20–25 minutes before brewing. Lock the empty portafilter into the group head during warm-up, this pre-heats the metal so it does not drop the brew temperature when cold metal meets hot water.
Flush 20–30ml of water through before the shot. This clears stale water from the boiler path and stabilizes the group head temperature.
Step 2 — Weigh Your Dose
Grind directly into your portafilter basket while it sits on the scale. Tare the scale, then stop at your target dose, typically 18g for a 58mm basket.
Consistency in dose is non-negotiable during dialing in. If the dose changes between shots, you have two variables moving at once. Lock it down.
Step 3 — Grind Fine (Then Adjust)
Espresso requires a fine grind, much finer than drip or pour-over. Think fine sand, not coarse sand and definitely not table salt.
Here is the simplest mental model: imagine water flowing through gravel versus water flowing through packed sand. Gravel lets water rush straight through. Packed sand slows it down and forces contact with every grain.
Too coarse = the water floods through fast with barely any extraction. The shot is sour, watery, done in 10 seconds.
Too fine = the water can barely pass through. The machine struggles. The shot drips for 45 seconds and tastes bitter and dry.
Your grind controls the flow rate. And the flow rate is the primary thing you adjust when the shot time is wrong.
Step 4 — Distribute Evenly
Before tamping, the grounds need to be level and evenly distributed in the basket. Uneven distribution creates channels, pathways where water takes the path of least resistance, blasting through loose spots and bypassing the rest of the puck.
You do not need a WDT (Weiss Distribution Technique) tool on day one. Just tap the portafilter gently on the side of your palm to settle the grounds, then use your finger to level the top surface roughly. Some people use a small distributor tool, worth it eventually, not essential right now.
The goal: a flat, even coffee bed before the tamper touches it.
Step 5 — Tamp Level and Firm
Place the tamper on the grounds and press straight down with even, steady pressure. The key word is level; a tilted tamp creates an uneven puck, and an uneven puck creates channeling.
Tamp pressure matters less than people think. The specific amount of force is less important than consistency. 15–20kg of pressure is a commonly cited range, but honestly, the most useful practice is locking in a repeatable, level motion every single time.
Do not use tamping as a dial-in variable. Use grind size. Tamping should stay constant while you adjust everything else.
Step 6 — Pull to Yield, Not Volume
Lock the portafilter in. Place your cup on the scale. Zero it. Start the timer the moment the pump activates.
Watch the scale, not the cup. Stop the shot when the yield hits your target, 36g for a standard 1:2 recipe. Time is secondary feedback; yield is primary.
Your first few shots may arrive too fast (under 20 seconds) or too slowly (over 40 seconds). That is normal. That is the dial-in process. The next section covers exactly how to fix it.
Step 7 — Taste Before Changing Anything
Smell the crema. Stir the shot briefly to integrate layers. Then taste it.
Not the crema alone, crema is often bitter on its own, even on a well-extracted shot. Taste the whole cup.
Note whether it tastes: sharp and sour, bitter and dry, thin, hollow, or balanced and sweet. Write it down if you have to. That note is what tells you which direction to adjust.
Change one variable at a time. One. That is how you learn what is actually happening.
How to Dial In Espresso
Dialing in just means adjusting your shot to hit the right extraction. You start with the baseline recipe, observe the time and taste, and make one change at a time until the shot is where you want it. 📊
If the Shot Runs Too Fast
Fast shot = water blasting through without enough resistance. The most common cause is a grind that is too coarse.
First fix: grind finer. One or two notches at a time. Re-pull. Check time again.
Secondary causes: not enough coffee in the basket (low dose), poor distribution (grounds not packed evenly), stale coffee (old CO₂-depleted beans offer less resistance), or, if you have a pressurized basket, normal behavior for that basket type.
Target: a slower, even flow that reaches your yield in 25–30 seconds.
If the Shot Runs Too Slow or Chokes
Slow shot = too much resistance. The water is fighting too hard to pass through. This often sounds like the machine straining, the pressure is high but the flow is a painful drip.
First fix: grind coarser. One or two notches. Re-pull.
Secondary causes: too much coffee for the basket (high dose), overly aggressive tamping on an already fine grind, or a clogged basket (a backflush or basket soak will fix this).
If the Shot Tastes Sour
Sour espresso = under-extraction. The water passed through before it could dissolve the sweeter, more complex compounds in the coffee. The acids came out first. The sweetness never made it.
First fix: grind finer to slow the flow and increase extraction.
If the flow time was already in the right range but the shot still tastes sour, try pulling a slightly longer yield, 38g or 40g instead of 36g. More water through the same puck extracts more of the sugars that fix sourness.
Still sour? Raise the brew temperature slightly if your machine allows it. Cooler water under-extracts; hotter water pushes extraction further. For lighter roasts specifically, higher temperatures are often needed to unlock sweetness.
Worth knowing: new bags of coffee that are very freshly roasted (within 4–6 days of roast) can taste sour due to excess CO₂ degassing. Let the bag rest for 7–14 days after the roast date before using it for espresso.
If the Shot Tastes Bitter
Bitter espresso = over-extraction. The water was in contact with the coffee too long, or the grind was too fine, or the yield was too long, and the more astringent, harsh compounds came out alongside the good stuff.
First fix: grind coarser to speed the flow and reduce extraction.
If time is already normal but bitterness persists, try stopping the shot a few grams earlier, 33g instead of 36g. For darker roasts specifically, a slightly lower brew temperature can reduce harshness.
One common source of confusion: crema often tastes bitter on its own. If you are tasting the crema separately and calling the shot bitter, stir the cup first, then re-evaluate. The bitterness of the crema layer can skew the perception of an otherwise balanced shot.
Espresso Troubleshooting Table
This is the section that will save you the most frustration. ⚙️📊
| Problem | Most Likely Cause | First Fix | Second Fix |
|---|---|---|---|
| Shot runs too fast (under 20 sec) | Grind too coarse; not enough resistance from the puck | Grind finer, 1–2 notches | Check dose — underfilling the basket reduces resistance |
| Shot chokes or drips (over 40 sec) | Grind too fine; too much puck resistance | Grind coarser, 1–2 notches | Check dose — overfilling restricts flow; clean basket holes |
| Espresso tastes sour | Under-extraction; fast flow; low yield; cool temperature | Grind finer; or pull a slightly longer yield (38–40g) | Raise brew temperature; use fresher beans rested 7–14 days |
| Espresso tastes bitter | Over-extraction; grind too fine; yield too long | Grind coarser; stop shot 3–4g earlier | Lower brew temperature slightly for dark roasts |
| Thin, watery body | Ratio too long; grind too coarse; possible channeling | Grind finer while keeping the same yield target | After grind is correct, shorten yield slightly to tighten body |
| Weak or no crema | Old beans (past 4–6 weeks from roast); low temperature; grinder limitations | Use fresher beans; check roast date on bag | Improve puck distribution; check brew temperature |
| Channeling (uneven extraction, spraying, pale streaks) | Uneven distribution or tamping; gaps in the puck | Re-distribute grounds more carefully before tamping | Switch to non-pressurized basket for better visibility |
| Shots taste different every day | Multiple variables changing (dose, grind, temperature, yield) | Weigh dose and yield every single shot | Change only one variable between shots when dialing in |
| Good shot time but bad taste | Time alone does not guarantee balanced extraction | Adjust yield — try 1–2g shorter or longer | Re-check puck prep and brew temperature |
| Watery, sour, fast — all at once | Pressurized basket masking grind problems | Switch to non-pressurized basket; dial in grind properly | Lower dose slightly until flow normalizes |
Espresso Ratios by Taste
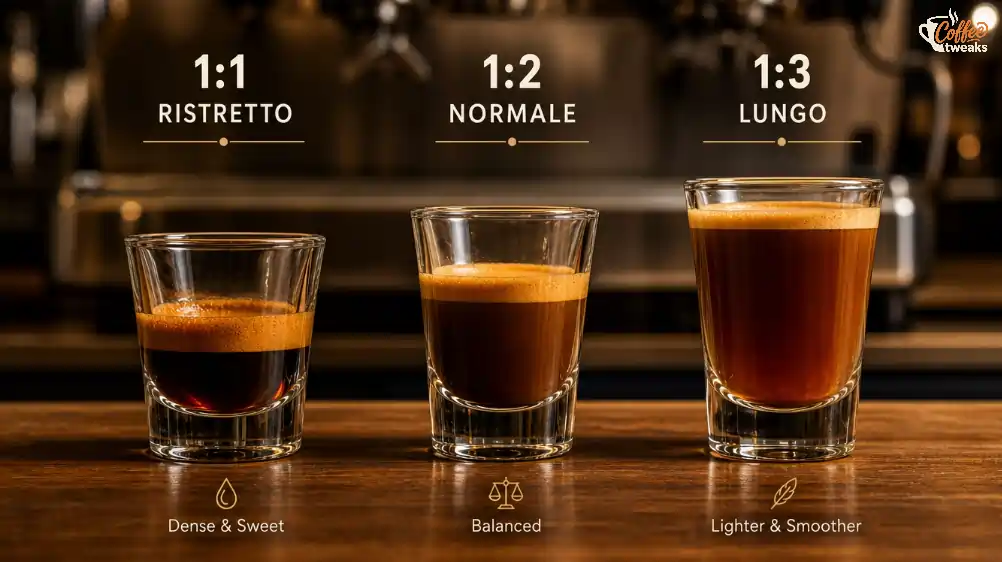
Once your baseline 1:2 shot is dialed in, you can start intentionally adjusting the ratio to shift the flavor profile. This is where espresso gets genuinely interesting. ☕
1:1 to 1:1.5 — Ristretto
Dense. Concentrated. Syrupy. Often very sweet with excellent body and almost no bitterness.
At this ratio, only the early-extracted compounds make it into the cup — the sweetest sugars and brightest acids. The more astringent compounds stay in the puck.
Not the easiest starting point for beginners because the margin for error is narrow. But if your coffee consistently tastes slightly bitter at 1:2, a shorter pull might actually fix it.
Dose: 18g. Yield: 18–27g.
1:2 to 1:2.5 — Normale
This is the standard. The place where most espresso drinks are built.
Balanced sweetness, acidity, and bitterness. Good body. Works well as a standalone shot and as a base for milk drinks.
Dose: 18g. Yield: 36–45g.
This is where beginners should live while learning. It is the most forgiving and the most instructive.
1:3 — Lungo
Longer extraction, lighter body, more dissolved solids overall. Less intense than a normale. Can taste thinner if the grind is not dialed in.
Useful if your 1:2 shots consistently feel sharp or sour and grind adjustments are not fixing it. A 1:3 pull can extract more sweetness and balance the acidity — but only if the grind is producing good flow in the time window.
Dose: 18g. Yield: 54g. Time: often 35–45 seconds.
Choosing Your Beans
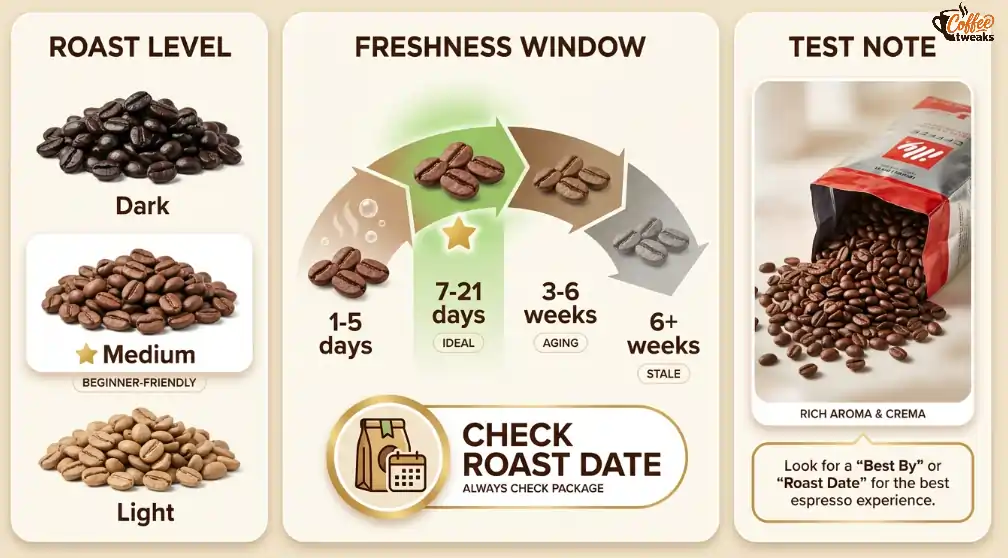
Here is the thing nobody tells you about beans and espresso machines…
Not all coffee is equally forgiving in a home espresso setup. The roast level, freshness, and bean origin all affect how easy or difficult it is to dial in a shot.
Roast Level
Freshness
Coffee for espresso is best used between 7–21 days after the roast date. Earlier than that (especially within 4–5 days) and the beans are degassing CO₂ aggressively, shots will be gassy, sour, and hard to dial in. Older than about 6 weeks and extraction becomes flat and crema disappears.
Check the roast date on the bag, not the “best by” date.
A Personal Testing Note
For this guide I tested the process using Illy Coffee beans because many new espresso owners can find them locally and they produce fairly consistent results, the roast level is medium to medium-dark, the blend is relatively forgiving across different machine types, and the grind window for a balanced shot is wide enough that minor errors are recoverable. This is not a recommendation based on the brand. It is a note about what was on the bench during testing.
Puck Prep — The Underrated Variable
Most beginner tutorials cover dose, grind, and time. Very few explain puck prep in plain terms. It is one of the biggest sources of inconsistency that has nothing to do with the machine.
The puck is the compressed coffee disc inside the portafilter basket. It needs to be:
When the puck has gaps or uneven density, water finds the soft spots and blasts through them. This is channeling. The result is a mix of over-extracted coffee (from the dense spots) and under-extracted coffee (from the channeled spots) in one cup, which is why it tastes both sour and bitter at the same time. Confusing and demoralizing for a beginner.
The fix is simple: take 15 more seconds before tamping. Level the bed with your finger or a distributor. Tamp straight down. Then pull.
Shot Evaluation — What Good Espresso Actually Tastes Like
This sounds obvious. It is not.
Most beginners have never tasted a genuinely well-extracted espresso. They are comparing their shots to café drinks (which may include steamed milk) or to supermarket capsules (which use different extraction mechanics entirely).
A balanced shot from fresh, well-dialed coffee should taste:
If it tastes flat, hollow, or thin, extraction is low. If it tastes harsh, dry, or astringent, the extraction is high. If it tastes sharp and one-dimensional sour — it is definitely under-extracted and needs a finer grind or longer yield.
Technically speaking, but also taste-wise… the goal is balance. Sweetness carrying the shot, with acidity and bitterness as supporting characters rather than leads.
Morning Repeatability — Building a Consistent Routine
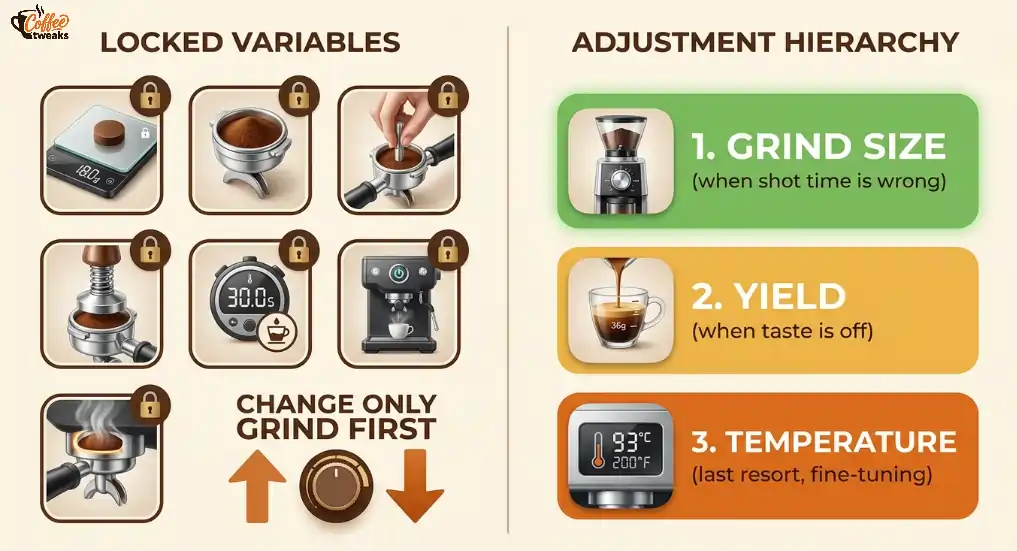
Here is the actual enemy of good home espresso: not doing the same thing twice.
A great shot on Tuesday means nothing if Wednesday's shot is pulled on a cold portafilter with a different dose, a different yield stop, and a guess on grind setting. The variables change, the result changes, and you have no idea what to fix.
Keep these fixed, every single morning:
Change only this first: grind size, when the shot time is off.
Then adjust taste: yield, when flow time is correct but the shot still tastes sour or bitter.
Last resort: temperature, when everything else is locked in and the taste still does not match the recipe.
This order matters. Grind affects time. Yield affects taste. Temperature is fine-tuning. Treating them in reverse creates chaos.
I measured this. Keeping dose and yield fixed while adjusting only grind size reduced my shot-to-shot inconsistency more than any other single change. The scale is not optional gear. It is the whole game. 📊
Beginner Mistakes to Avoid
These are the patterns that cost most people months of frustration. Worth a hard look.
Chasing Crema
Crema is seductive. It looks like proof that the shot is good. It is not.
Crema is an emulsion of CO₂ gas, water, and coffee oils, it forms on fresh coffee and is affected by temperature, dose, and roast level. Old beans produce weak crema. Very light roasts produce little crema. A thick, persistent crema is a sign of freshness and reasonable puck prep, but it does not mean the shot tastes good.
Test this: taste just the crema alone. It is almost always bitter. What matters is the whole cup, not the topping.
Using Time as the Only Measure
“My shot takes 28 seconds so it should be right”, this reasoning breaks down quickly.
A shot can take 28 seconds and taste sour (if the yield is too low, or the coffee is very fresh). A shot can take 28 seconds and taste bitter (if the grind is very fine with a high yield). Time is a constraint, not a verdict.
Time + yield + taste = the actual evaluation. Time alone is only one-third of the picture.
Changing Multiple Variables at Once
This is the one that costs people the most time.
You pull a shot. It tastes sour. So you: grind finer, increase dose, increase yield, and raise temperature, all between one shot and the next.
The next shot tastes better. But now you have no idea which change fixed it. And when it goes wrong again on Wednesday, you have no idea where to start.
Change one thing. Pull the shot. Evaluate. Change one thing again. This is not patience for its own sake. It is how you actually learn what your machine, your grinder, and your beans are doing.
Beans, Grind, and Dose — The Practical Relationship
These three variables are connected in ways that matter practically. 📊
| Roast Level | Suggested Starting Grind | Recommended Ratio | Notes |
|---|---|---|---|
| Light roast | Fine (finer than medium roast) | 1:2.5 to 1:3 | Needs higher temperature; harder to dial in |
| Medium roast | Medium-fine (ideal starting point) | 1:2 to 1:2.5 | Best for beginners; widest error margin |
| Dark roast | Medium-fine to medium | 1:1.5 to 1:2 | Extracts faster; lower temperature helps |
When you switch to a new bag of beans, even the same brand, same roast, expect to re-dial. Different bags behave differently. Freshness, roast date, and humidity all shift the grind window.
This is normal. It is not a failure. It is just the nature of working with a natural agricultural product. The good news: once you have the skill, re-dialing a new bag takes two or three shots rather than twenty.
Equipment Notes for Home Use
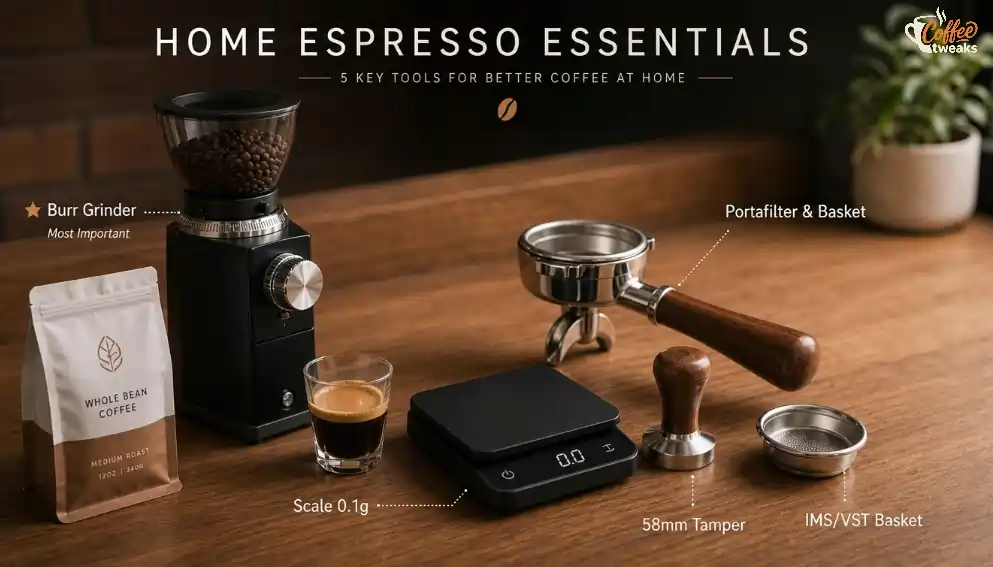
You do not need to spend a lot of money to get good espresso. But there are minimums.
Grinder: The most important equipment purchase after the machine itself. A burr grinder, even a budget-level one, will produce more consistent results than the best espresso machine paired with a blade grinder. No exceptions.
Scale: Any food scale with 0.1g accuracy and a tare function. You do not need an espresso-specific scale, though they are more convenient. Cost: $15–$25.
Tamper: The tamper that came with most home machines is often undersized (58mm baskets sometimes shipped with 57mm tampers). Check the fit. A snug fit with no visible ring of untamped grounds around the edge is what you want.
Basket: Once you are ready, a quality aftermarket basket from IMS, VST, or similar manufacturers will produce noticeably more even extractions than stock baskets. Not a day-one purchase, but worth knowing about.
For this guide, testing was also done using Illy Coffee beans on a standard home espresso machine with a non-pressurized double basket and a basic 0.1g scale. The steps above produced consistent results within 4–5 shots of dialing in on each new bag.
Frequently Asked Questions
What is the ideal espresso shot ratio for a beginner?
Start at 1:2 — 18g of coffee in, 36g of liquid out. It is the most forgiving ratio for most medium roast beans and the easiest to adjust from. If shots taste persistently sour, move to 1:2.5. If they taste hollow, try 1:1.5.
How long should an espresso shot take?
Aim for 25–30 seconds from when the pump activates to when you stop the shot. Under 20 seconds usually means a grind that is too coarse. Over 40 seconds usually means a grind that is too fine or a basket that is too full. Time is a guide — taste and yield are the final judge.
Why does my espresso taste sour no matter what I do?
Sour espresso is under-extracted. The most common causes: grind too coarse, yield too short, brew temperature too low, or beans that are too freshly roasted (within 4–5 days of roast). Start by grinding finer. If time is already in range, try pulling a slightly longer yield or raising temperature 1–2°C.
Why is my espresso bitter even though my shot time is correct?
Bitterness despite correct timing usually means the yield is too long (too much water through the puck), the grind is very fine creating high extraction even at the right time, or — very commonly — you are tasting the crema alone, which is naturally bitter. Stir the cup before tasting. If still bitter, try stopping the shot 3–4g earlier.
Do I need a scale to pull a good espresso shot?
Yes. Not because espresso is precious, but because without weighing dose and yield, you are changing two variables every time without knowing it. A $15 scale is the highest ROI purchase in home espresso. It removes more inconsistency than any equipment upgrade.
Why does my espresso taste different every morning?
Because something is changing between shots — and you may not realize what. The most common culprits: dose is not weighed (so it varies), grind setting is being adjusted too aggressively, machine is not fully warmed up, or puck prep is inconsistent. Lock dose and yield with a scale. Give the machine 25 minutes to warm up. Pull the same shot twice in a row. If they taste the same, the process is stable.
What is the easiest way to fix espresso channeling?
Even distribution before tamping. Channeling happens when water finds a soft spot in the puck and blasts through it rather than flowing evenly. Spend 15 extra seconds leveling the coffee bed with your fingertip before tamping. Tamp straight and level. A simple redistribution step eliminates most channeling in home setups without any extra tools.
Should I change grind or dose first when dialing in?
Always adjust grind first. Grind controls flow rate, which controls shot time. Keep the dose locked and change the grind until the time is in the target window. Only adjust dose after grind is stable — and only in small increments of 0.5g at a time.