
How to Make Iced Coffee at Home (Simple, Quick and Strong)


Real talk… most iced coffee recipes online are doing too much.
You don’t need a 16-hour cold brew.
You don’t need a flash chilling setup.
You definitely don’t need three different brewing devices and a thermometer you’ll lose by Tuesday.
You need good coffee. The right dilution. The right ice ratio. That’s it.
Learning how to make iced coffee at home properly takes about five minutes once you understand two things: strength and dilution. Get those right, and every cup you make will beat the average café version. Get them wrong, and you end up with brown water over ice, which is what most people are accidentally producing.
This guide covers the method, the ratios, the milk and sweetener options, the mistakes, and five coffee directions genuinely worth trying. No filler.
Why Most Iced Coffee Recipes Taste Weak
Here’s the thing. The single most common complaint about homemade iced coffee is that it tastes watery. And the reason is almost always one of these:
The fix is straightforward. Brew stronger. Use less ice than you think. Or split the dilution intentionally so the ice replaces part of the brew water. All three methods work. I’ll walk you through the cleanest one below.
How to Make Iced Coffee at Home
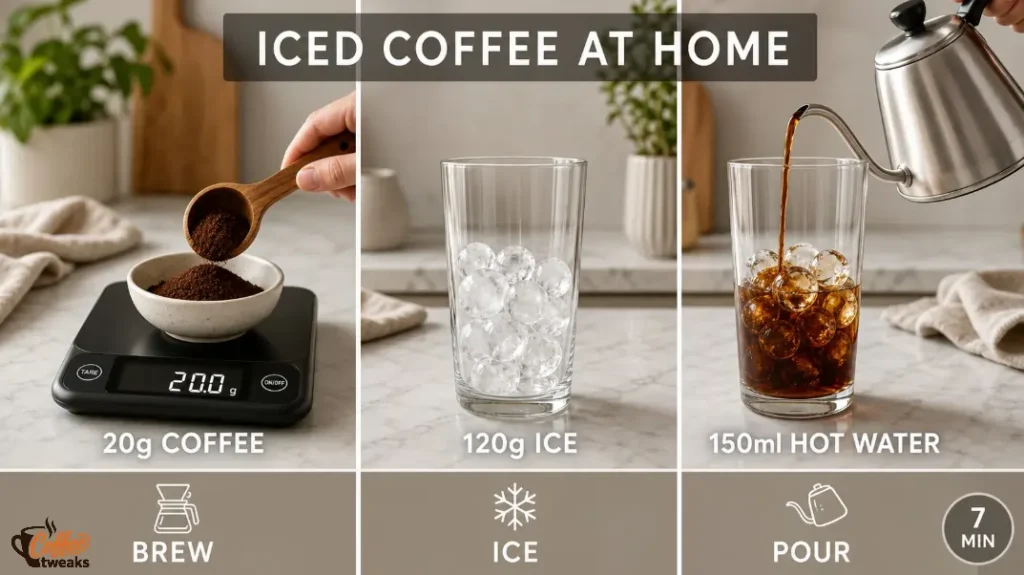
Prep Time: 2 minutes | Brew Time: 4 to 5 minutes | Total Time: 7 minutes | Yield: 1 serving (approximately 300ml)
Ingredients:
Method (Short Version):
- Brew coffee at double strength using 20g coffee to 150ml water.
- Place 120g of ice directly in your serving glass.
- Pour the hot concentrate directly over the ice immediately after brewing.
- Add milk and sweetener if using.
- Stir and serve.
Why It Works: Brewing at double strength compensates for the dilution caused by melting ice. The rapid chilling from the ice preserves aromatic compounds that would otherwise degrade during slow cooling.
The Right Method for Quick Iced Coffee
This is the method I use constantly. It works with a V60, a Chemex, a drip machine, an AeroPress, or even a Moka pot. The device barely matters. The ratio and temperature do.
The Double Strength Drip or Pour-Over Method:
| Element | Standard Hot Coffee | Iced Coffee Concentrate |
|---|---|---|
| Coffee dose | 15g | 20g |
| Water | 250ml | 150ml |
| Water temp | 90-93°C | 88-93°C |
| Ice | None | 120g in serving glass |
| Total drink volume | ~250ml | ~270ml after ice melt |
| Brew ratio | 1:16 | 1:7.5 concentrate |
Step-by-Step:
- Grind 20g of coffee to a medium-fine grind (slightly finer than your usual drip setting to account for the lower water volume).
- Heat water to 88 to 93°C. Not boiling. A full boil will over-extract and turn bitter once cold.
- Add 120g of ice to your serving glass before you start brewing.
- Brew 150ml of hot concentrate directly, using your usual device.
- Pour the concentrate immediately over the ice while still hot.
- The ice chills it instantly and provides the remaining dilution.
- Add milk and sweetener. Stir. Done.
Why this works better than brewing regular coffee and chilling it:
Brewing directly over ice locks in volatile aromatic compounds at the moment of extraction. Slow cooling allows those compounds to degrade and oxidise, which is why coffee that sits and cools in a pot tastes flat. Immediate chilling captures the coffee at its peak.
Easy Iced Coffee Recipe
Equipment:
Ingredients:
Instructions:
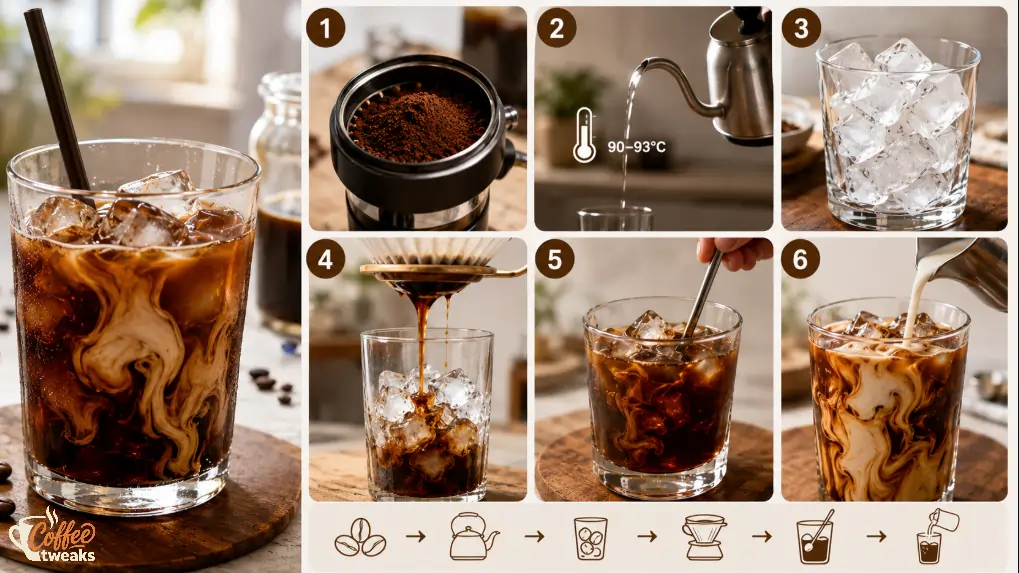
- Step 1: Grind your coffee slightly finer than your usual drip setting. You’re using less water, so you need a slightly more efficient extraction.
- Step 2: Heat your water. Use a thermometer or let a full kettle rest for 30 seconds off the boil to hit the 90 to 93°C range.
- Step 3: Fill your serving glass with 120g of ice. Set it directly under your dripper or in position to receive the brew.
- Step 4: Brew 150ml of hot coffee concentrate directly over the ice in the glass. If your dripper sits too high, brew into a separate vessel and pour immediately.
- Step 5: Once the concentrate hits the ice, it will hiss slightly and cool within seconds. Stir gently.
- Step 6: Add milk and sweetener. Taste and adjust. Serve immediately.
Notes:
Milk Options That Actually Work
Not all milks behave the same way in iced coffee. Temperature matters here. Cold milk added to an already-cold drink won’t emulsify the same way warm milk does in a latte. So the choice of milk has a more obvious flavour impact in iced coffee than in hot drinks.
Whole Milk: The gold standard for iced coffee. It has enough fat to soften acidity, add body, and carry sweetness without masking the coffee flavour. If you want a creamy iced coffee that still tastes like coffee, this is the answer.
Oat Milk: Genuinely the best dairy-free option for iced coffee. Barista-grade oat milk has a neutral sweetness and a creamy texture that works naturally with medium and dark roasts. It doesn’t split or go watery the way some nut milks do. Low key obsessed with oat milk in iced coffee, especially with a brown sugar syrup.
Almond Milk: Thin and nutty. It works if you like a lighter drink, but it can separate if the coffee is still slightly warm. Barista-formulated almond milk handles it better than the supermarket carton version. Best with medium roasts that have a natural sweetness.
Half and Half (or Single Cream): Rich, indulgent, and genuinely excellent if you’re making something dessert-adjacent. It adds significant body and rounds out bitterness in dark roasts. Not the healthiest option daily but worth it occasionally.
Condensed Milk: A different category entirely. Vietnamese-style iced coffee with sweetened condensed milk is one of the best things you can do with a strong brew. It adds sweetness and fat simultaneously. The flavour is heavy, sweet, and extremely satisfying. Use sparingly or it dominates everything.
| Milk Type | Texture | Sweetness | Best Roast Match |
|---|---|---|---|
| Whole milk | Creamy | Neutral | Any |
| Oat milk | Creamy, smooth | Lightly sweet | Medium, dark |
| Almond milk | Thin, light | Slightly nutty | Medium |
| Half and half | Very creamy | Rich | Dark roast |
| Condensed milk | Thick, heavy | Very sweet | Dark, espresso-based |
Sweetener Options
This matters more in iced coffee than hot coffee because cold temperatures suppress sweetness perception. A drink that tasted adequately sweet at 60°C will taste noticeably less sweet at 5°C. You need more sweetener, or a better sweetener.
Simple Syrup (1:1 sugar to water): The correct choice for most people. It dissolves instantly in cold liquid, unlike granulated sugar, which just sinks and sits at the bottom doing nothing. Make a batch on Sunday and keep it in the fridge for the week.
Brown Sugar Syrup: All the dissolving advantages of simple syrup plus a warm, toffee-like depth that pairs beautifully with darker roasts. If you’re making something resembling a Starbucks brown sugar oat milk shaken espresso at home, this is what you need.
Honey: Works reasonably well but needs to be dissolved in a small amount of warm water first or it will clump. Adds a floral quality that pairs best with lighter or medium roasts. Too much honey in a dark roast becomes confusing.
Maple Syrup: Underrated in iced coffee. Pure maple syrup (not the pancake syrup impostor) adds a subtle earthiness and natural sweetness. It dissolves fairly easily even cold. Good with oat milk.
Flavoured Syrups: Vanilla, caramel, hazelnut, lavender, cinnamon. If you’re building a more elaborate iced drink, these are the tools. Vanilla syrup is the most universally useful. Lavender works surprisingly well with Ethiopian-origin coffees that have floral notes. Cinnamon syrup pairs with anything dark and chocolatey.
Avoid: Granulated sugar in cold drinks. It will not dissolve and you’ll end up crunching on sugar at the end of your drink.
Iced Americano Recipe

The iced americano is not the same thing as an iced coffee brewed via drip. It’s espresso-based, which means you need an espresso machine, a Moka pot, or a strong AeroPress shot to make it properly.
What is an iced americano?
Espresso diluted with cold water and served over ice. The classic iced americano recipe is simple: pull a double shot, add cold water, pour over ice. Done.
Iced Americano Recipe:
| Ingredient | Amount |
|---|---|
| Espresso (double shot) | 60ml (2 shots) |
| Cold filtered water | 120ml |
| Ice | 150g |
Method:
- Pull a double espresso shot (18 to 20g coffee in, approximately 40 to 60g liquid out depending on your preference).
- Fill a glass with 150g of ice.
- Pour 120ml of cold water over the ice first.
- Pour the espresso shots over the top of the cold water and ice.
Pourover order matters. Adding espresso to cold water (rather than cold water to espresso) preserves the crema and prevents the espresso from shocking into bitterness. This small step genuinely changes the texture of the final drink.
Ratio: 1 part espresso: 2 parts cold water, with ice making up the remaining volume.
Variations:
The iced americano recipe is the fastest route to excellent iced coffee if you already have an espresso setup. Under 3 minutes from beans to glass.
Mistakes That Ruin Iced Coffee
I’ve been wrong before. Not about these.
1. Brewing at standard strength
Every time. This is the number one mistake. Regular drip coffee is not strong enough to survive ice dilution. Always brew at least 1.5x to 2x your normal dose for the same water volume.
2. Using stale or poorly stored beans
Stale coffee tastes flat hot. Over ice, that flatness becomes amplified. Coffee used for iced drinks should be no more than three to four weeks from roast date. Keep beans in an airtight container away from light and heat.
3. Using boiling water
Water at 100°C over-extracts the bitter compounds in coffee. Those compounds become the dominant flavour once the drink cools. Target 88 to 93°C.
4. Wrong ice ratio
Too much ice dilutes the coffee before you even taste it. Too little ice means it melts slowly and you end up with lukewarm coffee. 120g of ice for a 300ml drink is the sweet spot.
5. Adding milk to a warm concentrate
If you pour milk into coffee that hasn’t chilled yet, the milk warms up and the emulsion separates slightly. Always let the concentrate hit the ice first, then add milk.
6. Using pre-ground coffee that’s been open for weeks
Ground coffee oxidises within days of opening. Ground coffee sitting in a bag for three weeks produces flat, cardboard-tasting coffee regardless of how well you brew it. Grind fresh or buy in smaller quantities.
7. Skipping the stir
The concentrate that lands first is the strongest. The meltwater at the top is the weakest. Always stir before tasting.
Can You Make Iced Coffee Ahead of Time?
Yes. With limits.
Option 1: Brew concentrate, refrigerate, serve over fresh ice
Brew your double-strength concentrate, skip the ice step, let it cool to room temperature, then refrigerate in a sealed container. It stays good for up to 48 hours. When you’re ready to drink it, pour over fresh ice and add milk.
The flavour will be slightly flatter than freshly brewed, because some aromatic compounds do degrade overnight. But it’s still significantly better than cold brew if you use good beans and the right ratio.
Option 2: Coffee ice cubes
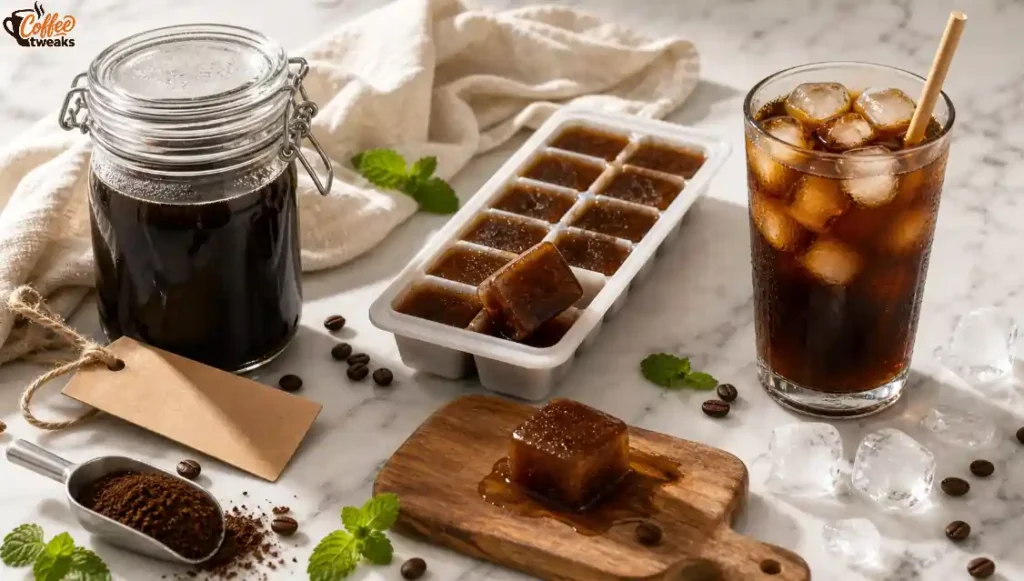
Freeze leftover concentrate in an ice cube tray. Use those cubes instead of water ice. As they melt, they add coffee rather than water, so the drink never dilutes. This is genuinely one of the smartest things you can do for make-ahead iced coffee.
Option 3: Cold brew for 24+ hour planning
If you’re planning days ahead, cold brew makes sense. Steep coarse ground coffee in cold water for 16 to 24 hours at a 1:8 ratio, filter, and refrigerate for up to two weeks. But that’s not what this article is about. This article is about the fast method that’s ready in under 10 minutes.
Do not store milk-mixed iced coffee overnight. Milk begins to separate and the flavour goes off within hours. Always add milk fresh to each serving.
Your Iced Coffee, Your Calories: What Each Build Costs You
| Serving Style | Calories | Protein | Fat | Carbs | Sugar |
|---|---|---|---|---|---|
| Black iced coffee | 5 | 0.3g | 0g | 0g | 0g |
| With whole milk (60ml) | 40 | 2g | 2g | 3g | 3g |
| With oat milk (60ml) | 30 | 0.5g | 1g | 4g | 2g |
| With simple syrup (2 tsp) | 40 | 0g | 0g | 10g | 10g |
| Full iced latte style | 80 | 3g | 3g | 9g | 8g |
| With condensed milk (2 tbsp) | 130 | 2g | 2.5g | 22g | 22g |
Values are approximate and based on standard serving sizes.
5 Iced Coffee Flavour Ideas Worth Trying
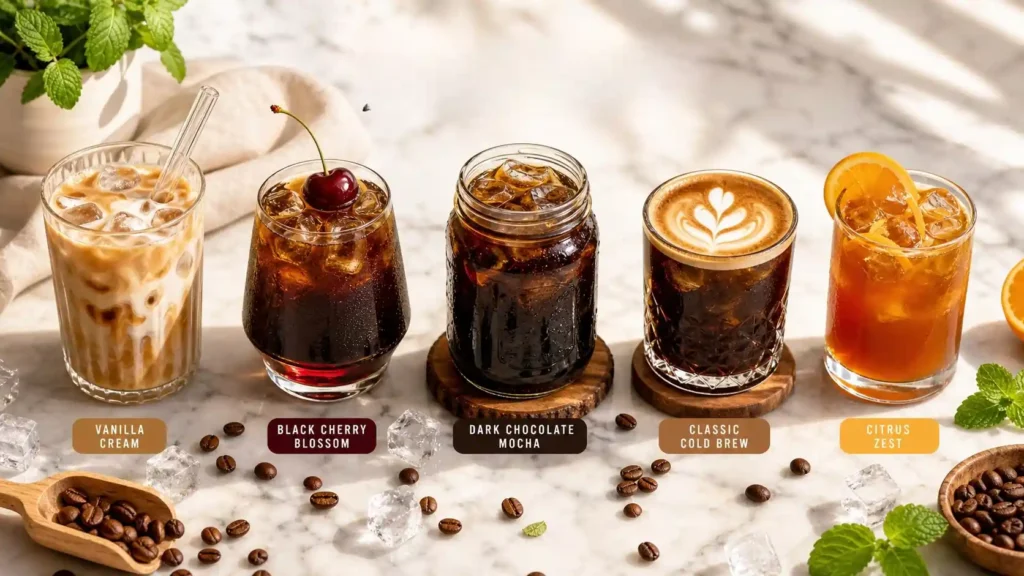
The five coffees below were selected from a broader review of twenty coffee brands. The selection criteria were simple: flavour profile that survives dilution and ice, brewing versatility across different home methods, genuine accessibility, and whether the coffee actually performs better cold than it does hot. Not every well-known brand made the cut, and I’m not apologizing for that.
1. The Smooth Low-Acid Direction: Lifeboost Medium Roast
Inspired by Lifeboost Coffee’s medium roast profile, this flavour direction is for people who want iced coffee that is genuinely smooth, gentle on the stomach, and free from the sharp, biting acidity that can become aggressive once chilled.
😋 Taste profile: Rich and clean, with muted brightness, a naturally sweet finish, and no harshness on the back palate. Think smooth chocolate tones without any edge.
✅ Why it works iced: Low-acid coffees don’t amplify sourness when chilled, which is a real problem with some higher-acid single origins poured over ice. The sweetness holds and the body translates well into a cold drink.
👉 Who will enjoy it: Anyone with acid sensitivity, people who find iced coffee too sharp or sour, or anyone who simply wants a clean, drinkable cup without complexity.
❌ Who should skip it: Coffee drinkers who love bright, fruity, or wine-like flavour notes. This is not that direction.
2. The Luxury Bold Direction: Koa Coffee Private Reserve
Inspired by Koa Coffee’s 100% Kona beans, this flavour direction is for when you want iced coffee that feels genuinely special. Hawaiian Kona is one of the most distinctive origin profiles in coffee, and it translates beautifully over ice.
😋 Taste profile: Silky and round, with dark chocolate, a subtle cherry note, and a clean, mellow finish. No bitterness. No astringency. Just polished, smooth coffee.
✅ Why it works iced: The natural low acidity and the clean processing of Kona beans means the flavour holds steady under ice dilution. You lose none of the chocolate depth. It’s one of the few origin profiles that actually improves slightly when cold because the sweetness becomes more prominent.
👉 Who will enjoy it: Anyone who treats their morning iced coffee as a proper ritual rather than a caffeine delivery mechanism. People who appreciate premium, single-origin flavour.
❌ Who should skip it: Budget-conscious shoppers. Genuine 100% Kona coffee is expensive by design. If the price is a concern, this is not the direction.
3. The Bold Everyday Direction: Death Wish Coffee Dark Roast
This flavour direction takes its cues from Death Wish Coffee’s dark roast profile: serious, bold, and unapologetically strong. If you’ve ever made iced coffee and thought it tasted like flavoured water, this is the correction.
😋 Taste profile: Dark chocolate, black cherry, a roasty richness, and a strong caffeine punch. The flavour is bolder than most supermarket dark roasts but without the burnt, ashy quality that badly roasted dark coffee produces.
✅ Why it works iced: The intense flavour concentration means this coffee holds up to ice dilution better than almost anything else. Where a medium roast might thin out, this direction stays bold and satisfying even in a large glass with plenty of ice and milk.
👉 Who will enjoy it: High-caffeine seekers, people who love their iced coffee strong enough to actually taste, and anyone who’s been disappointed by light roasts going flat over ice.
❌ Who should skip it: Light roast enthusiasts, people who are caffeine-sensitive, or anyone who prefers delicate, nuanced flavour over sheer intensity.
4. The Classic Cafe Direction: Peet’s Major Dickason’s Blend
This flavour direction draws from one of the most consistent and well-regarded blends in the American specialty coffee market. Peet’s Major Dickason’s dark roast has been a benchmark blend for decades, and it performs brilliantly in iced applications.
😋 Taste profile: Rich, full-bodied, with layered notes of dark chocolate, earthy spice, and a smooth, complex finish. It has the kind of depth that works in a straight black iced coffee, a milky iced latte, or anywhere in between.
✅Why it works iced: The multi-origin blending that defines this profile creates a balanced cup that doesn’t skew bitter or overly acidic when chilled. It’s one of the most versatile iced coffee bases available at mainstream retail. The chocolate and spice notes are particularly compelling with oat milk.
👉 Who will enjoy it: Anyone who wants a reliable, accessible, genuinely good iced coffee base that’s easy to find and consistently well-roasted. Perfect for the person who wants coffee shop quality without specialty shop pricing.
❌ Who should skip it: Diehard single-origin purists who want clear terroir expression. This is a blend designed for consistency, not origin showcase.
5. The Bright Specialty Direction: Stumptown Hair Bender
Inspired by Stumptown’s Hair Bender blend, this flavour direction is for people who want their iced coffee to be genuinely interesting. Where some of the other directions on this list prioritise smoothness and boldness, this one leads with complexity and brightness.
😋Taste profile: Citrus notes, dark chocolate, and a layered sweetness that comes from coffees sourced across Latin America, Indonesia, and Africa. The flavour is expressive and dynamic, shifting slightly as the ice melts and the concentration changes.
✅Why it works iced: ☕🎯 The blend’s multi-origin structure creates a flavour that doesn’t collapse into blandness when chilled. The citrus and chocolate notes both survive dilution well, and the overall cup stays interesting from the first sip to the last.
👉 Who will enjoy it: Specialty coffee drinkers who appreciate complexity. People who’ve been brewing pour-over or AeroPress for a while and want an iced coffee that reflects that level of quality.
❌ Who should skip it: Anyone who finds specialty coffee “too sour” or who prefers flat, traditional coffee flavour. The brightness here is intentional and it’s not for everyone.
Frequently Asked Questions
What coffee works best for iced coffee?
A medium or dark roast brewed at double strength delivers the boldest, most flavourful iced coffee.
Can I make iced coffee without espresso?
Yes. Double-strength drip or pour-over coffee works perfectly and produces a smooth, well-balanced iced coffee.
Why does my iced coffee taste watery?
Brewing at standard strength and pouring over ice causes dilution, making your iced coffee taste weak.
Can I use instant coffee?
Yes. Dissolve instant coffee in a small amount of hot water first, then pour directly over ice.
How much ice should I use?
Use approximately 120g of ice per 300ml serving to chill without over-diluting your iced coffee.
Can I make iced coffee the night before?
Yes. Brew a strong concentrate, refrigerate overnight, then pour over fresh ice and add milk before serving.
What milk tastes best in iced coffee?
Whole milk delivers the creamiest result, while barista-grade oat milk is the best dairy-free alternative available.
What’s the difference between iced coffee and cold brew?
Iced coffee is brewed hot and chilled rapidly over ice. Cold brew steeps in cold water for 12 to 24 hours.
Wrapping Up
The formula for genuinely good iced coffee at home is not complicated.
That’s it. No cold brew waiting overnight. No expensive equipment. No flash chilling setup that costs more than a good espresso machine. Just well-brewed, properly concentrated coffee, hit with the right amount of ice, served immediately.
Once you’ve dialled in the ratio once, you’ll make iced coffee at home better than most cafés do without thinking about it. And you’ll stop paying $7 for something you can make in seven minutes.